请保留-> 【原文: https://blog.csdn.net/luobing4365 和 http://yiiyee.cn/blog/author/luobing/】
最近有些程序,只能在实际机器的UEFI Shell下进行测试。比如上一篇的diskdump程序,在模拟器下是没法运行的。
模拟器上运行,可以直接使用各种截屏软件截图,图像还是比较清晰的。在实际机器上运行,只能使用手机录像或者拍照。自己的拍照技术有多糟糕,我还是很清楚的。所拍出的照片,只能勉强看清楚程序的运行情况。因此,后期还得在电脑上用PS处理一下。
这种情况遇到多了,总得想个办法解决一下。
今天早上上班的路上,冒出一个想法,何不写个UEFI Shell下截屏的软件?
需要解决的问题不多,主要包括以下几个:
1) 截屏程序要能常驻内存,以允许其他程序在运行的时候唤出;
2) 设置键盘热键,可以随时唤出后台运行的截屏程序;
3) 将整个屏幕以bmp图像的格式,存储在硬盘或者U盘上。
有点类似以前DOS系统下的常驻内存程序TSR一样,早期的DOS中有大量这样的程序存在。
想了一下实现方法,觉得应该可以在UEFI下把这个截屏软件实现出来。常驻内存应该可以通过UEFI驱动的方式实现,屏幕获取和存取BMP图像比较简单,之前写的图像处理代码稍微修改就可以了。
不过,越深入思考,越觉得在哪看过这样的想法。
查了下平常的开发日志,果然,微软的Github库中,提供了同样功能的软件。很久以前我就看过了,只是一直没有去编译测试。
这个UEFI程序存在于微软在Github上的mu_plus库中,库的地址为:https://github.com/microsoft/mu_plus.git。
截图软件位于mu_plus的MsGraphicsPkg中,名称为PrintScreenLogger。
既然已经有了,就没必要再写了,本篇试着了解其实现原理,并在实际环境中测试一下。
1 PrintScreenLogger的代码结构
从整体设计上来看,与想象的差不多。PrintScreenLogger采用了UEFI驱动的形式,让程序可以常驻内存。
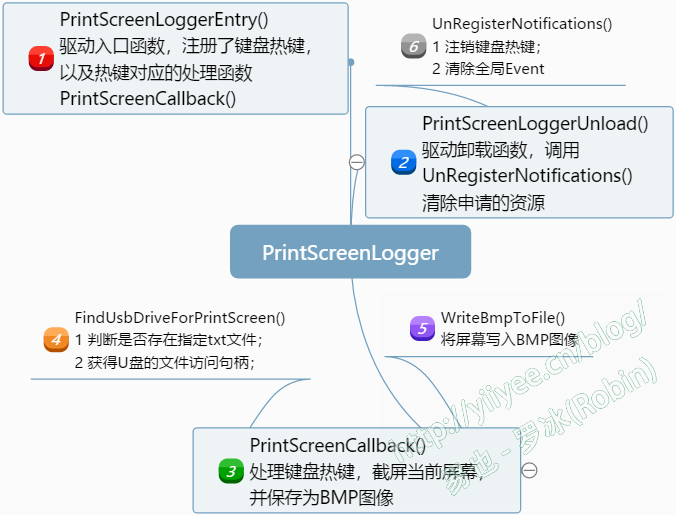
其代码结构如图1所示。

从结构上来看,主要是由三个函数组成:PrintScreenLoggerEntry()、PrintScreenLoggerUnload()和PrintScreenCallback()。全局事件gTimerEvent用来同步,以预留足够的时间存储BMP图像到磁盘中。
1)PrintScreenLoggerEntry()
这是驱动的入口函数,在此函数中,注册了两个热键:左Ctrl+PrtScn和右Ctrl+PrtScn,以及相应的热键处理函数PrintScreenCallback()。
另外,在函数中创建了全局EVT_TIMER型事件gTimerEvent。函数的实现代码如下:
/**
  Main entry point for this driver.

  @param    ImageHandle     Image handle of this driver.
  @param    SystemTable     Pointer to the system table.

  @retval   EFI_STATUS      Always returns EFI_SUCCESS.

**/
EFI_STATUS
EFIAPI
PrintScreenLoggerEntry (
  IN EFI_HANDLE           ImageHandle,
  IN EFI_SYSTEM_TABLE     *SystemTable
  )
{
    EFI_STATUS      Status = EFI_NOT_FOUND;
    INTN            i;

    DEBUG((DEBUG_LOAD, "%a: enter...\n", __FUNCTION__));

    //
    // 1. Get access to ConSplitter's TextInputEx protocol
    //
    if (gST->ConsoleInHandle != NULL) {
        Status = gBS->OpenProtocol (
                        gST->ConsoleInHandle,
                        &gEfiSimpleTextInputExProtocolGuid,
                        (VOID **) &gTxtInEx,
                        ImageHandle,
                        NULL,
                        EFI_OPEN_PROTOCOL_BY_HANDLE_PROTOCOL);
    }
    if (EFI_ERROR(Status)) {
        DEBUG((DEBUG_ERROR, "%a: Unable to access TextInputEx protocol. Code = %r\n", __FUNCTION__, Status));
    }  else {

        //
        // 2.  Register for PrtScn callbacks
        //
        for (i = 0; i < NUMBER_KEY_NOTIFIES; i++) {
             Status = gTxtInEx->RegisterKeyNotify (
                          gTxtInEx,
                          &gPrtScnKeys[i].KeyData,
                          PrintScreenCallback,
                          &gPrtScnKeys[i].NotifyHandle);
            if (EFI_ERROR (Status)) {
                 DEBUG ((DEBUG_ERROR, "%a: Error registering key %d. Code = %r\n", __FUNCTION__, i, Status));
                 break;
            }
        }

        if (!EFI_ERROR(Status)) {
            //
            // 3. Create the PrtScn hold off timer
            //
            Status = gBS->CreateEvent(
                                EVT_TIMER,
                                0,
                                NULL,
                                NULL,
                                &gTimerEvent);
            if (!EFI_ERROR(Status)) {
                //
                // 4. Place event into the signaled state indicating PrtScn is active.
                //
                Status = gBS->SignalEvent (gTimerEvent);
            }
        }

        if (!EFI_ERROR(Status)) {
            DEBUG((DEBUG_INFO, "%a: exit. Ready for Ctl-PrtScn operation\n", __FUNCTION__));
        } else {
            UnRegisterNotifications ();
            DEBUG((DEBUG_ERROR, "%a: exit with errors. Ctl-PrtScn not operational. Code=%r\n", __FUNCTION__, Status));
        }
    }

    return EFI_SUCCESS;
}
2)PrintScreenLoggerUnload()
PrintScreenLoggerUnload()与PrintScreenLoggerEntry()是相对的,它是驱动卸载函数。将之前申请的键盘热键注销,并删除创建的全局事件gTimerEvent。实现代码如下:
/**

  Callback to cleanup the driver on unload.

  @param    Event           Not Used.
  @param    Context         Not Used.

  @retval   None

**/
EFI_STATUS
EFIAPI
PrintScreenLoggerUnload (
  IN  EFI_HANDLE   ImageHandle
  )
{
    UnRegisterNotifications ();
    return EFI_SUCCESS;
}
/**
  Unregister TxtIn callbacks and end the timer

**/
VOID
UnRegisterNotifications (
    VOID
    ) {
    INTN       i;
    EFI_STATUS Status;

    for (i = 0; i < NUMBER_KEY_NOTIFIES; i++) {
        if (gPrtScnKeys[i].NotifyHandle != NULL) {
            Status = gTxtInEx->UnregisterKeyNotify (gTxtInEx,  gPrtScnKeys[i].NotifyHandle);
            if (EFI_ERROR(Status)) {
                DEBUG((DEBUG_ERROR, "%a: Unable to uninstall TxtIn Notify. Code = %r\n", __FUNCTION__, Status));
            }
        }
    }

    if (gTimerEvent != NULL) {
        gBS->SetTimer (gTimerEvent, TimerCancel, 0);
        gBS->CloseEvent (gTimerEvent);

    }
}
3)PrintScreenCallback()
截屏的主要功能,都集中在这个函数中。先贴出函数的实现:
/**
  Handler for hot key notification

  @param KeyData         A pointer to a buffer that is filled in with the keystroke
                         information for the key that was pressed.

  @retval  EFI_SUCCESS   Always - Return code is not used by SimpleText providers.

**/
EFI_STATUS
EFIAPI
PrintScreenCallback (
  IN EFI_KEY_DATA     *KeyData
)
{
    EFI_FILE_PROTOCOL *FileHandle;
    UINTN              Index;
    CHAR16             PrtScrnFileName[] = L"PrtScreen####.bmp";
    EFI_STATUS         Status;
    EFI_STATUS         Status2;
    EFI_FILE_PROTOCOL *VolumeHandle;

    // We only register two keys - LeftCtrl-PrtScn and RightCtrl-PrtScn.
    // Assume print screen function if this function is called.
    DEBUG((DEBUG_INFO,"%a: Starting PrintScreen capture. Sc=%x, Uc=%x, Sh=%x, Ts=%x\n",
        __FUNCTION__,
        KeyData->Key.ScanCode,
        KeyData->Key.UnicodeChar,
        KeyData->KeyState.KeyShiftState,
        KeyData->KeyState.KeyToggleState));

    Status = gBS->CheckEvent (gTimerEvent);

    if (Status == EFI_NOT_READY) {
        DEBUG((DEBUG_INFO,"Print Screen request ignored\n"));
        return EFI_SUCCESS;
    }

    //
    // 1. Find a suitable USB drive - one that has PrintScreenEnable.txt on it.
    //
    Status = FindUsbDriveForPrintScreen(&VolumeHandle);

    if (!EFI_ERROR(Status)) {
        //
        // 2. Find the first value of PrtScreen#### that is available
        //
        Index = 0;

        do {
            Index++;
            if (Index > MAX_PRINT_SCREEN_FILES) {
                goto Exit;
            }

            UnicodeSPrint (PrtScrnFileName, sizeof (PrtScrnFileName), L"PrtScreen%04d.bmp", Index);
            Status = VolumeHandle->Open (VolumeHandle, &FileHandle, PrtScrnFileName, EFI_FILE_MODE_READ, 0);
            if (!EFI_ERROR(Status)) {
                if (Index % PRINT_SCREEN_DEBUG_WARNING == 0) {
                    DEBUG((DEBUG_INFO,"%a: File %s exists.  Trying again\n", __FUNCTION__, PrtScrnFileName));
                }
                Status2 = FileHandle->Close (FileHandle);
                if (EFI_ERROR(Status2)) {
                    DEBUG((DEBUG_ERROR,"%a: Error closing File Handle. Code = %r\n", __FUNCTION__, Status2));
                }
                continue;
            }
            if (Status == EFI_NOT_FOUND) {
                break;
            }
        } while (TRUE);

        //
        // 3. Create the new file that will contain the bitmap
        //
        Status = VolumeHandle->Open (VolumeHandle, &FileHandle, PrtScrnFileName, EFI_FILE_MODE_READ | EFI_FILE_MODE_WRITE | EFI_FILE_MODE_CREATE, EFI_FILE_ARCHIVE);
        if (EFI_ERROR(Status)) {
            DEBUG((DEBUG_ERROR,"%a: Unable to create file %s. Code = %r\n", __FUNCTION__, PrtScrnFileName, Status));
            goto Exit;
        }

        //
        // 4. Write the contents of the display to the new file
        //
        Status = WriteBmpToFile (FileHandle);
        if (!EFI_ERROR(Status)) {
            DEBUG((DEBUG_INFO,"%a: Screen captured to file %s.\n", __FUNCTION__, PrtScrnFileName));
        }
        //
        // 4. Close the bitmap file
        //
        Status2 = FileHandle->Close (FileHandle);
        if (EFI_ERROR(Status2)) {
            DEBUG((DEBUG_ERROR,"%a: Error closing bit map file %s. Code = %r\n", __FUNCTION__, PrtScrnFileName, Status2));
        }
Exit:
        //
        // 5. Close the USB volume
        //
        Status2 = VolumeHandle->Close (VolumeHandle);
        if (EFI_ERROR(Status2)) {
            DEBUG((DEBUG_ERROR,"%a: Error closing Vol Handle. Code = %r\n", __FUNCTION__, Status2));
        }
    }

    // Ignore future PrtScn requests for some period.  This is due to the make
    // and break of PrtScn being identical, and it takes a few seconds to complete
    // a single screen capture.
    Status = gBS->SetTimer (gTimerEvent, TimerRelative, PRINT_SCREEN_DELAY);

    return EFI_SUCCESS;
}
函数首先去找当前的存储设备中,是否为U盘,并且在其根目录下是否存在文件PrintScreenEnable.txt。这是通过函数FindUsbDriveForPrintScreen()实现的。
FindUsbDriveForPrintScreen()函数在处理完后,会返回EFI_FILE_PROTOCOL型指针变量,作为后续访问此U盘的文件Protocol实例。
然后对U盘根目录下的文件进行分析,看是否存在PrtScreen####.bmp(####取值范围0000至0512)。这是一个遍历查找的过程,同时在遍历过程中,创建PrtScreen####.bmp(顺序查找,比如存在PrtScreen0000.bmp至PrtScreen0015.bmp,则创建PrtScreen0016.bmp)。
创建成功后,调用WriteBmpToFile(),将当前屏幕截图存入到创建的bmp文件中。
需要注意的是,在函数的末尾,对gTimerEvent设定了3秒的触发时间。这段时间是用来让设备完成BMP文件的存储的,防止还没有存好,又进入了截图的进程。
函数中调用的FindUsbDriveForPrintScreen()和WriteBmpToFile(),请在篇末给出的项目工程中查看源代码,其实现就不贴出分析了。
2 测试运行
前几天写的硬盘访问Diskdump,所拍的图很差劲,我一直不满意(上一篇UEFI开发探索98的图2)。正好今天来实验一下新的截图方式。
原始的PrintScreenLogger中,有些小问题导致无法编译。主要是头文件的包含,以及几个强制转换的问题。现在放在RobinPkg下的项目文件,我已经修改过了,可以使用如下命令进行编译:
C:\vUDK2018\edk2>build -p RobinPkg\RobinPkg.dsc -m RobinPkg\Drivers\PrintScreenLogger\PrintScreenLogger.inf -a X64将其拷贝到带有UEFI Shell的U盘中,并在U盘根目录下创建PrintScreenEnable.txt,文件内容为空即可。
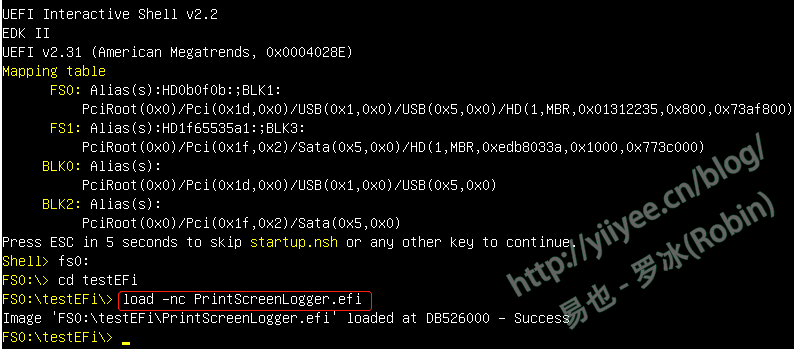
启动UEFI Shell,加载PrintScreenLogger.efi,如图2所示。

加载成功后,可以使用Ctrl+PstScn截图,图像将存储在U盘的根目录下,名称为PrtScreen####.bmp(####取值范围0000至0512)。实际上,图2就是使用这种方法截取的。
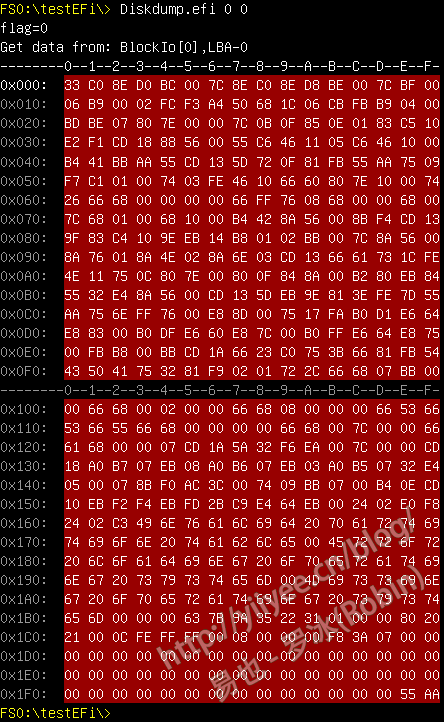
运行上一篇的Diskdump程序,所截取的图如图3所示:

对比上一篇博客最后的测试结果图,很明显这张图更为清晰。图3是由两张图拼接而成的,主要是一个屏幕无法完整显示512字节的数据。拼接的时候,我没有进行任何美化处理,只是把多余的的内容删掉了。
至此,我们就拥有了在UEFI下截图的工具了。
考虑到平常的需求,我觉得可以做个简单的录屏软件,记录在UEFI Shell下的操作了。当然,也可以简单处理,在1秒内定时采集24张图片(也可以更少写,1秒8-12帧)。得到的图片再使用软件进行逐帧整合处理,就能得到操作过程了。
有时间的时候,再稍微改改,实现这个需求吧。
本篇的项目代码地址如下:
Gitee地址:https://gitee.com/luobing4365/uefi-explorer
项目代码位于:/ FF RobinPkg/RobinPkg/Drivers/PrintScreenLogger下
4,405 total views, 1 views today